Designing a Facilitator training - Part 2
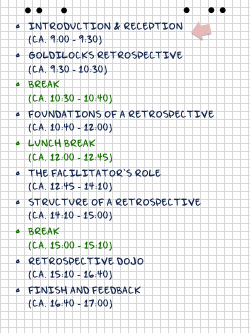
Posted on 02/29/12.In the first post of this series, I gave you an overview of the design principles and an outline of the actual workshop. Meanwhile I’ve been through a couple of iterations of the training. I incorporated a lot of valuable feedback and like to give you a little more detail on the current version. So in this part, I’ll write about both the preparation and the first two sections of the workshop. Hopefully you will find this useful for your own trainings.
Setting the stage
Let’s start with the preparation. I decided to use a flip chart for presenting the workshop’s material instead of a slide deck for a more inclusive experience. To be honest, the first attempt could only be called a paper orgy. I now use two flip charts, one holding the prepared material, which I will describe in more detail when I write about the various exercises, the other being used for capturing the participants’ input. This also allows me to reuse most of the sheets. If you go for a similar apprach, I suggest numbering all of the sheets to make it easier to produce a photo protocol afterwards. In reaction to feedback I received, I also hang up a sheet showing the agenda with a sticky note indicating the current item and an initially empty sheet labeled “Activities”.

Having two or three mobile pinboards at hand won’t hurt, either. I use those for displaying important results and to separate workspaces during the retrospective dojo. I also bring along my facilitator’s toolcase, an ample supply of sticky notes and markers and of course candy bars.
When preparing the room, I arrange the chairs in a half circle facing the flip charts. Additionaly, there should be one table for every four or five participants for group work and the retrospective dojo. Talking of numbers, I’ve had good experiences with around 15 participants. With larger groups I felt pressed to stay on schedule. I am yet to facilitate the workshop with less than 12 participants and would be interested to hear whether the exercises work well with smaller groups.
As a last detail, be sure to explicitely mention that participants need to be familiar with the tale of Goldilocks and the three bears when writing invitations and bring a few printed copies of the story as backup plan. Ending up without a shared context when trying to do the Goldilocks Retrospective is no fun.
Reception and Introduction
After all participants have arrived and things settled down, I welcome everybody and explain a few organisational details. Stuff I mention includes:
- The general outline of the workshop.
- The breaks, as in my experience, people tend to feel less of an urge to check their emails during the training when they know in advance that the agenda includes frequent breaks.
- The interactive nature of the training, including the invitation to ask whatever questions come to mind.
- The material every participant will receive after the workshop.

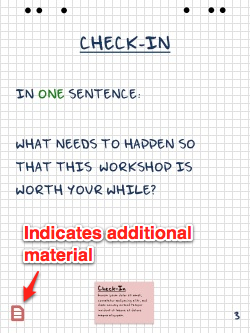
Feedback from earlier iterations of the workshop suggests that the last point is really important with this format. As there are no hand-outs or slides and most of the content is collaboratively developed during the training, some participants haven’t been sure whether they were supposed to take notes. Now I point out that I will prepare a photo protocol and a fact sheet the next day. There is also symbol on some of the flip chart sheets that indicates that further resources are available as part of the workshop documentation (cf. image).
Once the training starts, ESVP (Explorer, Shopper, Vacationer, Prisoner) from Agile Retrospectives serves as icebreaker. You usually get a few laughs when explaining the Prisoner role and people start talking. To avoid wasting too much time here, I distribute slips of paper marked with the corresponding letters before the training starts. I don’t debrief this activity and instead follow up with my Check-In question, which I usually combine with a short introduction round: “Please introduce yourself and tell us in one sentence what needs to happen so that this workshop is worth your while.”. I capture the answers on a flip chart and revisit them during the workshop when I think we developed ideas that relate to the participants’ expectations.
In my usual audience, there is almost always someone who expects to get a good overview of what a retrospective should feel like. This allows me to lead over to the next section.
Goldilocks retrospective
I’d like to give credits to Sallyann Freundenberg for introducing me to this exercise at XP2010. It very elegantly solves the problem of not having a common context for demonstrating retrospectives.

The Goldilocks Retrospective serves multiple purposes:
- It provides a good impression of what a typical retrospective might look like.
- It allows me to model facilitation techniques for the audience right at the beginning of the workshop.
- It is a laid-back exercise that makes it easy for people to overcome any initial reluctance to participate.
- It is in itself a good template for a becoming facilitator’s first few retrospectives.
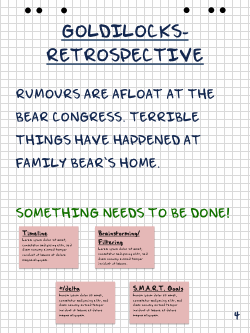
The retrospective itself looks like this:
- Set the stage with a very short introduction (5 minutes).
- Gather data with a Timeline and use a Dot Vote to determine which event has the biggest emotional impact on the group of bears having the retrospective (20 minutes).
- Generate insights with Brainstorming / Filtering. First, brainstorm with the question “What could be done to prevent this event?”. Then, reduce the options by filtering with the questions “Would it really prevent the event you voted for?” and “Can we realistically do this?” (20 minutes).
- Choose one of the remaining actions with another Dot Vote and refine it into a S.M.A.R.T. goal by asking “Who?”, “What?”, “When?” and “How will you measure success?” (10 minutes).
- Close the retrospective with a +/delta by asking “What helped you to achieve this result?” and “What should I try next time?” (5 minutes).
As I want the attendees to get a glimpse of what it means to facilitate a retrospective, I go strictly by the book (e.g. no meddling with the actual content, careful time management, etc.). I also try to model facilitation techniques as often and as explicitely as possible and every now and then stop to explain what I was doing. I am especially careful with those parts that are easy to get wrong when you start facilitating retrospectives (too much interpretation during the Gather data phase, no concrete actions or no commitment, etc.).
At this point, everyone will have actively participated in the training. Some people will just have seen their first “formal” retrospective. It’s time for the first break - remember the candy bars?
What’s next?
In the next part of the series, I will explain how I try to help attendees to develop an understanding of the fundamental principles of a retrospective (Retrospective Prime Directive, double-loop learning, etc.). In the meantime, I’m looking forward to your feedback.
